{[[' ']]}
']]}
digital painting of Genelia D'Souza
Posted by sridharkant
Posted on 11:23:00 pm
with No comments
Labels:
digital painting,
Indian Actress,
photoshop
digital painting of One
Posted by sridharkant
Posted on 11:12:00 pm
with No comments
Labels:
digital painting,
One,
photoshop
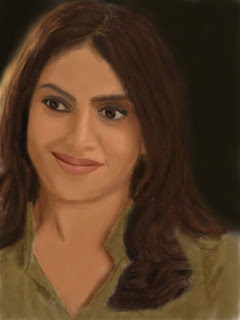
digital painting of Neha Dalvi
Posted by sridharkant
Posted on 10:55:00 pm
with No comments
Labels:
digital painting,
Neha Dalvi,
photoshop
digital painting of INCREDIBLE HULK
Posted by sridharkant
Posted on 7:14:00 pm
with No comments
digital painting,
Incredible Hulk,
photoshop,
{[[' ']]}
']]}
Labels:
digital painting,
Incredible Hulk,
photoshop
digital painting of Hulk
Posted by sridharkant
Posted on 7:04:00 pm
with No comments
Labels:
digital painting,
Hulk,
photoshop
Learn Digital Painting
Posted by sridharkant
Posted on 10:43:00 pm
with No comments
Digital Painting is a very easy to understand concept and very complicated when practicing. This section will definitely explain some of the basic terms related to digital painting.
Starting with a rough creation, resulting in a more detailed texture of a object from mind or from an inspiration. Okay enought talk. Let's get started:-
STEP-1:-
In this section i m going to explain a very easily creatable object "Stone".
We shall do this in Photoshop. Because i m good at it. In background layer, we are going to use a medium sized brush, with medium level of hardness around it. Select a little darker color of your choice that you wanted to be your stone's color. It should be low saturated or medium saturated depending on our type of stone. For a basic practice use a low saturated one. Create a rough shape of the stone. Play with the brush hardness and color saturation and try different techniques to achieve your result. Now out line the stone with more darker color and hardness and brush smaller in size. So that the stone gets its sharpness or roundness at the edge and becomes more visible at corners and at bumps. Upto this step we've confirmed our basic shape for the stone.
STEP-2:-
For a round surface, shadow starts from the middle and end up at the farther end from the light source. And it is opposite in case of concave type surface.Our stone is a little round in shape. So, we gonna use the first case. Use a more darker color than the stone is, and start darkening from the middle of the curvature to the lower portion. For beginners using a real stone as a reference is appreciated and recommended. There is no more explanation, but you guys should be able to study the object.
STEP-3:-
Now the lighter portion is to be drawn. Don't afraid to loose the creation. Create backups of your document at different stages to understand the improvements. Keep experimenting the image to as to satisfy your soul. If you think you are done. Relax your mind for a moment and again think of what can be done to push your limits to next extent.
STEP-4:-
Last and most complicated step of your painting. This is time when you figure out all of the possible improvements in your document. Trying to get more realistic look of it.
Well, this section doesn't explains what to do or every single step. This section requires you the ability of basic understanding of the interface of the Photoshop. Hope this things help.
Starting with a rough creation, resulting in a more detailed texture of a object from mind or from an inspiration. Okay enought talk. Let's get started:-
STEP-1:-
In this section i m going to explain a very easily creatable object "Stone".
We shall do this in Photoshop. Because i m good at it. In background layer, we are going to use a medium sized brush, with medium level of hardness around it. Select a little darker color of your choice that you wanted to be your stone's color. It should be low saturated or medium saturated depending on our type of stone. For a basic practice use a low saturated one. Create a rough shape of the stone. Play with the brush hardness and color saturation and try different techniques to achieve your result. Now out line the stone with more darker color and hardness and brush smaller in size. So that the stone gets its sharpness or roundness at the edge and becomes more visible at corners and at bumps. Upto this step we've confirmed our basic shape for the stone.
Base color
With Outline
STEP-2:-
For a round surface, shadow starts from the middle and end up at the farther end from the light source. And it is opposite in case of concave type surface.Our stone is a little round in shape. So, we gonna use the first case. Use a more darker color than the stone is, and start darkening from the middle of the curvature to the lower portion. For beginners using a real stone as a reference is appreciated and recommended. There is no more explanation, but you guys should be able to study the object.
With Shadows
STEP-3:-
Now the lighter portion is to be drawn. Don't afraid to loose the creation. Create backups of your document at different stages to understand the improvements. Keep experimenting the image to as to satisfy your soul. If you think you are done. Relax your mind for a moment and again think of what can be done to push your limits to next extent.
With Highlights
STEP-4:-
Last and most complicated step of your painting. This is time when you figure out all of the possible improvements in your document. Trying to get more realistic look of it.
Completed work
digital painting,
photoshop,
tips,
tricks,
tutorial,
windows,
{[[' ']]}
']]}
Digital Painting of rose flower
Posted by sridharkant
Posted on 10:44:00 am
with No comments
Labels:
digital painting,
photoshop,
Rose flower
Super power animation video
Posted by sridharkant
Posted on 10:17:00 am
with No comments
animation,
animation vs animation,
flash,
tutorial,
windows,
{[[' ']]}
']]}
Labels:
animation,
animation vs animation,
flash,
tutorial,
windows
Digital Painting of Spider Man
Posted by sridharkant
Posted on 10:12:00 am
with No comments
digital painting,
photoshop,
SpiderMan,
{[[' ']]}
']]}
Labels:
digital painting,
photoshop,
SpiderMan
Animation vs animation video
Posted by sridharkant
Posted on 7:24:00 am
with No comments
This is my very first animation vs animation video. Waiting for your comments.
animation,
animation vs animation,
flash,
{[[' ']]}
']]}
Labels:
animation,
animation vs animation,
flash
How to find out Square Roots of any number.
Posted by sridharkant
Posted on 10:47:00 pm
with No comments
Well it is quite clear from the title that this section only contains topic on finding Square Roots.
As per Mathematics, any problems can be solved either by predicting or by solving. Therefore Hit and Trial method can be used if and only if you have idea of a number. Otherwise, it's a waste of time.
Coming to the point, We're going to follow a step by step method to find out Square roots for a given number.
Step -1 :-
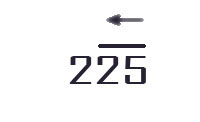
Let square of a number be 225.
To find out square root of a number we need to form pairs of the number. This is to be done from the right side to left side.

Now, as the pairing is done. a single number "2" is left. Now the next step is to start the common long division method.
Step -2 :-
When finding the square roots, At the time of dividing, one should always keep in mind that divisor should be a number multiplied by itself. Since we are determining square roots.

As per Mathematics, any problems can be solved either by predicting or by solving. Therefore Hit and Trial method can be used if and only if you have idea of a number. Otherwise, it's a waste of time.
Coming to the point, We're going to follow a step by step method to find out Square roots for a given number.
Step -1 :-
Let square of a number be 225.

Now, as the pairing is done. a single number "2" is left. Now the next step is to start the common long division method.
Step -2 :-
When finding the square roots, At the time of dividing, one should always keep in mind that divisor should be a number multiplied by itself. Since we are determining square roots.

From this it is clear and figured out that, the number 225 was square of the number 15. That's all.
I hope, this thing helps.
square roots,
tips,
tricks,
{[[' ']]}
']]}
Labels:
square roots,
tips,
tricks
DIGITAL PAINTING OF EDWARD,TWILIGHT SAGA
Posted by sridharkant
Posted on 10:35:00 pm
with No comments
Labels:
digital painting,
Edward,
photoshop
digital painting of kajal agarwal
Posted by sridharkant
Posted on 10:32:00 pm
with No comments
Labels:
digital painting,
Indian Actress
How to Use Group Policy editor (GPEDIT.msc)
Posted by sridharkant
Posted on 9:54:00 pm
with No comments
Tips and tricks in this section are very easy to understand. Because it does not cover any programming languages.
To open gpedit.msc, start " run " utility. Type in " gpedit.msc ".
A Group Policy window opens.
I am not going to explain any menu bar. So left side of the window shows the hierachies for every portion we are going to consider.
In Right hand side of the window, it shows the configuration item list
"Computer Configuration"
"User Configuration"
The Computer configuration section contains, settings that can be used to configure the computer's operations. Whereas the User configuration section contains, settings for every single user logged on to the computer.
Both configurations list contains three folders:-
Software settings
Windows settings
Administrative Templates
The "Administrative Templates" contains the part that is what is going to be our primary topic.
Administrative templates contains seven more folders that actually defines the settings related to that particular purpose.
Windows Componens:
Contains each n every windows related operations that can be avoided or forced.
For example:- If someone doesn't want the file menu to be visible in windows explorer. Then it is very handy to use this technique. This is how it should be experimented.:-
User Configuration - Administrative Template - Windows Components - Windows Explorer
Look for a section that asks for removing File menu from Windows Explorer. Open it by double clickin on it. In the properties dialogue box, enable it.
That's all refresh once. A go and check it out if your windows explorer contains file menu.:)
Start menu and taskbar: This folder contains settings related to start menu and taskbars.
Desktop: This folder contains settings related to desktop. That is any hack related to desktop can viewed in here.
Control Panel: Control panel settings can be edited or viewed in this folder.
Shared Folders, Network and System folder contains respected settings.
Well, I hope this things help.
3d,
gpedit.msc,
system,
tutorial,
{[[' ']]}
']]}
Labels:
3d,
gpedit.msc,
system,
tutorial


.jpg)


